Showing posts with label food. Show all posts

Saturday, January 7

Hello, Eggbert

or, How To Make A Four-Year-Old Laugh Out Loud With Delight

  1. While making lunch, add assorted food to a hard-boiled egg, e.g. cracker halves for feet, shredded cheese for hair, grape slices for eyes, and a celery slice for a mouth (grapes and celery skewered into place with toothpicks broken in half).
  2. Place plate in front of unsuspecting four-year-old.

IMG_0143IMG_0151IMG_0156IMG_0141

Tuesday, December 6

Cute Graham Cracker Cottages

DSC_0531

I had grand plans to host a “gingerbread” house decorating party with my neighbors this year like I did with my kids, nieces and nephews last year. And then I saw an article in the recent Family Fun Magazine with the same idea.

Only difference: their party used real gingerbread to construct the houses, baked and assembled by the host ahead of time. At my party, we used graham crackers! 20 rectangular crackers make a large house, like this one I made previously. And four rectangular crackers make a wee little cottage.

DSC_0496

I hesitate to even write this post since I did a google image search for “graham cracker gingerbread house” and found loads of examples of houses made from four crackers. BUT…

None had overhanging eaves.

imageimageimage

And I love overhanging eaves on my cottages.

image

So, here’s my little trick. For the side and the roof pieces, instead of the usual break-two-crackers-in-half approach, I saw just a little over one quarter off one side of the cracker. This small piece becomes the side of the house. And the almost-3/4s piece becomes the roof.image

For the other two crackers, I saw the corners off to make a nice steeply-pitched gable. image

My other trick, to keep them from toppling over when assembling them, is to start them off sideways. This probably only works since the side pieces are so short. I pipe the icing onto the backs of the gabled pieces, set the side pieces in place sticking straight up on one gabled pieces…

DSC_0392

…then set the other gabled piece on top and stand it upright to finish drying.

DSC_0393

A minute or two later, it’s ready for the roof. Icing goes all along the top edges (unlike photo where it’s only on half the edges)…

DSC_0396

…and roof pieces are put in place, with a little more icing right along the top ridge.

DSC_0397

Side note: that bit of pastry bag visible in a previous photo is a Wilton’s Disposable Decorating Bags with the tip snipped off and the other end closed off with a twist-tie. Great for little hands.

DSC_0473

Now, the question is, once they’re covered in candy, are those lovely overhanging eaves of mine even noticeable any more?

DSC_0511DSC_0520DSC_0513

When decorated by kids seven and under, not so much.

Hmm, maybe breaking them in half is the way to go after all. As least for a few more years while the emphasis is still on quantity over all else! : )

Wednesday, March 30

Prettier Chocolate Chip Cookies

Girls and I made chocolate chip cookies and it reminded me of a fun little tip I read somewhere. (Probably in Cook’s Illustrated – this sounds like their kind of tip…)

Cookies below are both from the same recipe, but the ones on the right look so much more chocolatey, don’t they?

IMG_5289

Why? Because when we were mixing up the dough, we kept some of the chips separate. Then after we’d scooped the dough onto the sheets, we pressed two or three more chips into the tops of the dough balls.

(Didn’t think to take pictures of that… Maybe because my fingers were too doughy and chocolatey…)

Is it a finicky, detailed, extra step? Sure it is (which is why I suspect it came from Cook’s Illustrated – ha ha; love that magazine!).

But does it give little kids a fun little job to do during cookie making time? Yup.

IMG_5291

And it makes a good-tasting cookie even more good-looking too. : )

Thursday, April 15

Mmm, goat cheese…

045

A friend called before breakfast. I was already up and out of the house. Said my cousin to the friend, “She’s out milking a goat.”

Ha! Bet ya’ weren’t expecting that one! Neither was I. It certainly wasn’t on my project list. Wasn’t even on my mental horizon.

But when a friend says “The kids and I are going up to The Berryhill Farm to milk a goat, then going back home to make some goat cheese. Wanna come?” how can I not enthusiastically answer “Of course!”?

So, it’s true. I milked a goat. So did my kid. And my friend. And her kids.

027

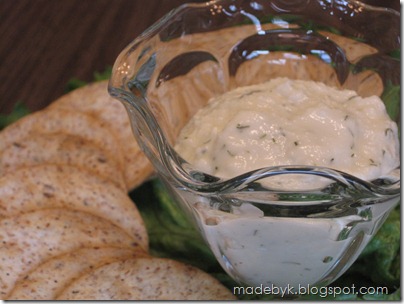
And then we took our 1/2 gallon of fresh goat’s milk and made goat cheese, seasoned with garlic and dill. A yummy adventure.

Makes me wonder -- what other kooky ideas are out there, not yet on my radar screen?

Monday, December 14

Serendipitous Spritz…

Finally asked my friend Jenna for her spritz cookie recipe after talking about it last month.

IMG_2741

It uses 3 egg yolks.

Which I already had sitting in a bowl in the fridge, waiting to be used after I turned their whites into royal icing the other day.

What a perfect December pairing – icing for a gingerbread house and Christmas Spritz. And no wasted egg parts. Makes me happy.

* * *

P.S. The barbarians have been out pillaging…

IMG_2743

Sunday, December 13

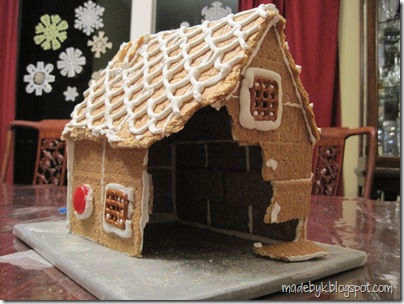
Graham Cracker “Gingerbread” House

IMG_2682

Hurray for neighbors who give me a box of graham crackers when I haven’t planned ahead for an imminent kids’ Christmas party to which I need to bring a constructed gingerbread house to decorate and now I’m surrounded by snow and frigid temperatures and therefore don’t want to take three kids out just to buy crackers or one of those kits that I saw multiple times in various stores yet didn’t throw in my cart for some unknown reason.

We got the house put together and we were only a little late dropping Sophie off to preschool because of it. (We wouldn’t have been late if I’d just let the kids eat Doritos in the car on the way there and called it “lunch.”)

I tried to save time by looking for graham cracker gingerbread house blueprints online, and even started following one of them, but didn’t like where it was headed – too small for 3 kids and a momma to work on, to0 squat, too.... So used the few pieces I’d already cut as a jumping off point and then worked on making a cottage more to my liking, with a steeply-pitched roof and overhanging eaves.

Including the broken pieces we couldn’t use and the ones we ate (better than Doritos for lunch, right?), we used a whole 14 oz. box of crackers. And I snapped a few photos along the way in case it turned out like I was hoping. Here they are if you’d like to try it too…

Oh, wait, the icing. I first made a quick batch of Gingerbread House Construction Glue a.k.a Royal Icing. Which I had never used before but, wow, I really like it!

Royal Icing Recipe (one of many many versions!):

  • 1 lb. confectioner’s sugar
  • 3 egg whites
  • 1/2 tsp. cream of tartar

(I’m told the cream of tartar helps the egg whites get fluffier when mixed…  And if kids eating stuff with raw egg in it gives you the heebie-jeebies, you could make it with meringue powder. But I didn’t have that in the house either. Plus we’re a batter-bowl-lickin’ household; I’m good with a little raw eggs in my kids…)

Beat ingredients for 7-10 minutes. Royal Icing dries fast so makes sure to keep it in an air-tight container. I loaded mine into a pastry bag with a round tip – you could also use a freezer bag (thicker plastic than sandwich baggie; less likely to break!) with the corner snipped off.

OK, now the photos…

Roof Layout – 8 whole crackers, 4 for each side IMG_2659

Side walls layout – 6 crackers with about 1/4 cut off each one, 3 crackers for each sideIMG_2658

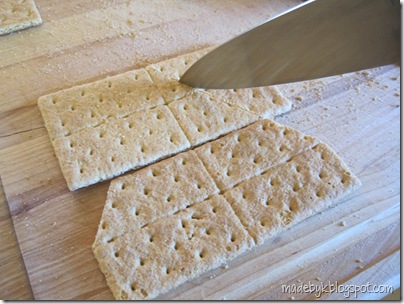
End walls layout – 6 crackers total; for each end, 1 whole cracker and 2 with bits cut off as shown in photo. I found it easiest to line them up, then score a line from the center of the top edge of the top cracker to the middle of the side edge of the second cracker.

IMG_2657

Note: for cutting the pieces with minimal breakage, I used the tip of my knife to cut a shallow line, then cut a little deeper on the next pass, and usually by the third, the cracker would break along the line. Sawing with a serrated knife worked well too.
IMG_2664

We glued together a “multi-cracker panel” for each roof and wall piece first, reinforcing it along the seams as shown below.

Icing piped along an edge…IMG_2662

Next piece squished into place…IMG_2663

Glob of icing for the reinforcement piece… IMG_2660

Scrap cracker glued over seam
so it’s less likely to buckle or come apart… IMG_2661Note from personal experience: Keep your reinforcement pieces near the center of the panels, i.e. not too close to the edges, so they aren’t in the way later during the building part!   

Once the panels are set, pipe some icing along their edges and form the house, keeping the reinforcement pieces to the inside – unless you were slick enough to make them look like windows and doors… IMG_2667

And while the girls were scarfing down their lunches, I realized I could turn the two scraps from one of the pointy wall cuts into a chimney. First, I cut two of the pieces into thirds, as shown below, and cut one of the long rectangles in half.IMG_2665

Then I discarded the two bitty triangles and one of the little triangles, leaving me with four pieces for my chimney…IMG_2666

Don’t have a close-up of the chimney, but here’s the house, pre-decorations. Oh, later we stuck another scrap (1/4 piece) on as the front door.

IMG_2669

Have fun! I’d love to see photos if you make this! Here’s ours again…

IMG_2688

P.S. Yes, this was supposed to be a “kids activity” but no, my children did not pipe the shingles and the icicles. Or anything else on the house itself for that matter.

They told me where, I piped, they stuck stuff.

The other moms gave me plenty of flack about that. I did eventually come to terms with the idea of letting a 2-, a 4- and a 6-year old wield the pastry bag; next time, I’ll try not to let it take me so long… I sure did love what they came up with on their own.

Especially Sophie’s “fence” (shown below right).

IMG_2687

What it lacks in perimeter it makes up for in thickness.

* * *

And coming soon, my latest harebrained project… Or is it hair-brained?

Sunday, November 22

Yummy Turkeys for your Thanksgiving Table…

I haven’t posted since Halloween and now it’s already Thanksgiving here in the States. How did that happen?

IMG_9069

Anyway, here’s a fun little snack we made with the kids a few years ago: tasty turkeys… that my kids didn’t complain about eating!

The above photo is the only one I could find. But they’re really simple to make. For each turkey you need:

  • 2 double stuf oreos
  • 5 candy corns
  • 1 raisinet (or some other chocolate covered something)

So then to make your little turkeys:

  1. Twist/pull one cookie off one of the double stuf oreos so you expose the frosting. There’s your turkey’s body.
  2. Eat the cookie so you have the energy needed to finish.
  3. Stick the second oreo—standing on edge—into the frosting of the first oreo near the side.
  4. Stick the candy corns upsidedown into the top of the second oreo. There’s the tail.
  5. Stick the raisinet into the frosting in front of the tail. There’s the head.

And it’s done. Yum.

Tuesday, May 26

Hamburger Cookies

IMG_3363 They look like little bite-sized burgers, but they taste like chocolate-y, coconut-y deliciousness!
I first saw these at a bake sale when I was in elementary school and still remember my glee at seeing such cute little cookies. And they are so easy to make…
Ingredients:
vanilla wafers, chocolate frosting,
nilla waferschocolate frosting
sweetened shredded coconut, green & yellow food coloring
coconut flakesgreen coloryellow color
Steps:
1) Pour out a pile of wafers and dust the crumbs off of them; otherwise the frosting doesn’t stick so well and is harder to spread.
IMG_3336IMG_3335
2) Spread frosting on flat side of wafers, lots of frosting on half of them and just a dab on the rest.
IMG_3343IMG_3344
3) Color coconut with food coloring until it looks like lettuce; using green is the obvious choice, but adding a touch of yellow makes it less day-glo, more realistic.
IMG_3352IMG_3341
4) Sprinkle some coconut on the lots-of-frosting wafers. Make sure to get it around the edges; if it’s only in the middle, you won’t see it!
IMG_3360IMG_3331
5) Put a dab-of-frosting wafer on top and press down slightly
IMG_3332IMG_3333
6) Let sit for a while so frosting can crust over a little and won’t squish out the sides when someone bites into the burgers. Finished!
IMG_3347
Additional Comments:
* Instead of chocolate frosting, you can substitute Nutella. Yum!
nutella
* Especially if you’re making this with small children, I suggest having a damp cloth nearby so people can wipe off the inevitable frosting that will end up on their fingers instead of licking it off. And then having to go wash their hands. Again.
IMG_3338 
* These look even cuter when they have sesame seeds stuck on their top wafer. I'd always heard of that being done by brushing on some egg whites first as “glue.” So I don’t usually do that because I figure some people don’t want raw egg on their desserts… Possible other options would be honey (maybe water down a bit) or corn syrup. Any other ideas?
IMG_3422
* Added from the comments below: After being stored overnight in a ziploc bag, the moisture from the frosting has softened the wafers just a touch, so now they're wonderfully bite-able. (When they're freshly made, biting into the crunchy wafers causes the burger-frosting to squish out the sides, especially if you're using Nutella.)

LinkWithin

Related Posts with Thumbnails