Monday, October 26

Sophie’s Halloween ‘09 Costume

IMG_2084

Managed to get one of the costumes done in time for the girls’ class today… well, except for the whip and gloves…

IMG_2080

Yes, my four-year-old wanted to be Catwoman for Halloween. Oops, I didn’t realize until just now that Catwoman is a Bad Guy…  Oh well, at least, Sophie’s inspiration was less “Halle Berry,” more “Lego Batman.”

image image

Found the jacket at a thrift shop, and best thing is she can wear it as a normal jacket when this is all over. Silver belt belongs to her older sister. Black leggings are mine – temporarily hemmed up about 6 inches, and waist rolled down about 6 times. Boots were repurposed. And mask was made from cheap black felt.

Now off to finish those gloves and whip…

Sunday, October 25

Too Much To Do Tutu

Hi there. Yes, I’m still here. I just get kinda quiet when I’ve promised something (e.g. Hello Kitty crochet pattern) and then take my sweet time in delivering. Keeps me from wanting to post anything else…

But time to jump back in. So let’s start with today’s project:

IMG_2062

The Too Much To Do Tutu.

Thusly named because I have

  • 2 Halloween costumes to finish (preferably by 3:45pm TOMORROW so my girls won’t be the only ones in their gymnastics classes not wearing costumes);
  • and a puppet theater to drape with curtains (not our cardboard theater – no, it’s someone else’s, I’m just the curtain-maker);
  • and a dress to transform by November (which will soon be here!!!);
  • and goulasch to cook up (or else figure out something else to do with the 6 pounds of beef and pork in my fridge!)
  • and… and… and…

But what do I do?

  • Make a tutu for a dear little friend of ours, who celebrated her 5th birthday party today! A party I’ve known about for weeks…

Which reminds me, Heidi and Lucy are still waiting for their tutus. I should make them quick while the steps are still fresh in my mind. And maybe take some pictures along the way.

But I’m not promising a tutorial.

‘Cause I’d like to post again before we see December.

Friday, October 9

Patterns, Poodles, and Praying Angels

Not too much “making by k” going on right now. Everyone in this house has been sick with something different this past week and my version seems to have moved into my nose and made itself comfortable for the long haul.

(Anyone know of a good way at 2 a.m. to unblock a nose enough so you don’t feel like you’re suffocating every time you have to close your mouth in order to swallow, especially when you’re horizontal, i.e. trying to sleep?!? Something other than Dayquil, Nyquil, various forms of Sudafed, Affrin, BreatheRight Strips, and a Netipot? Ken suggested I shove two straws up there. At this point, I’m quite tempted to try it…) Edited 10/11: Breathing easier. Thanks!

I have been working on typing up the Hello Kitty Scarf crochet pattern, which was going great til I couldn’t find a crucial page of my chicken-scratched notes. And my brain is currently taxed enough remembering my kids’ actual names, much less a series of stitches I did over a month ago…

In the mean time, Heidi… Lucy… Sophie has been delighting me with her construction paper creations. First my little designer outfitted a cereal box villa for her fist-sized poodle, who needs a comfy place to sleep…IMG_1542

…and somewhere to eat after she’s been out shopping with her pink purse. (Mom did help the designer make the table supports.) IMG_1549

There’s plenty of space in her trunk for all her purchases…IMG_1550
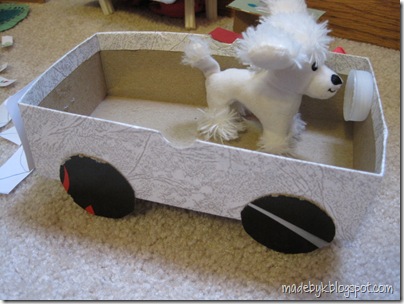
…and apparently she heard the same tip as her designer’s mom did, which is to keep a small waste basket in the car, not that her designer’s mom’s car looks anywhere near as tidy as hers.IMG_1551

Poodle also loves to read, use her yellow laptop, and send lots and lots of letters. And her kitchen is stocked with healthy produce.IMG_1546

She won’t let the weeks of non-stop rain we’ve been having bother her, not with her umbrella and rain slicker.IMG_1544
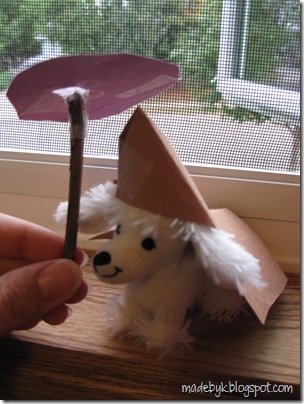
She’s spends a great deal of her time on her throne, bearing her crown and scepter – she is Queen Poodle after all…S couch for poodle plus queen stuff

…but she does also enjoy dressing up for a night out to eat. IMG_1692
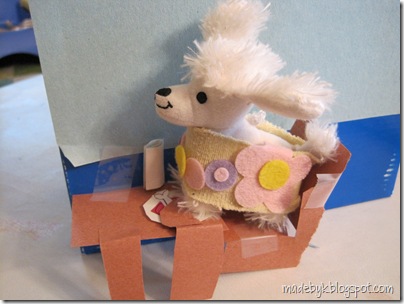
Unfortunately, while her designer’s mom was willing herself to get out of bed the other morning, her designer was busy cutting up a red table skirt, with which to upholster the throne, and a yellow sock, with which to make her evening gown. Her designer lost scissor privileges for the rest of that day…

Happily, scissors privileges have been restored and Sophie has returned to using appropriate materials only. Yesterday, she worked for quite a while on this angel who is praying (hopefully for my speedy recovery)… IMG_1736

“…in a park… at night…” under a dangling star “because angels always need those stars that hang down, you know?”IMG_1767
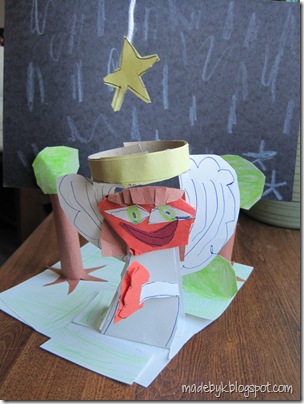
She got frustrated when her trees wouldn’t hold up her sky, so I did help her make some sturdier, slotted trunks...IMG_1770

…but the rest was all her. Her ideas, her design, her technique.IMG_1763

Makes my heart happy even though my nose is miserable.

And makes me wonder what she’ll make tomorrow.

So let’s try this sleeping thing again now…

Sunday, September 27

Meet My New Skirt

It’s deliciously lightweight and twirly and eclectically printed…

IMG_1451

…and it started out life as a dress, one of those “babydoll” numbers that’s a little too impractical for my current stage of my life.

IMG_1526

I can’t take credit for this transformation idea – my friend Mo was shopping, found a bunch of dresses on clearance for $5, figured they were too cute to pass up but too short and sassy for a busy mama to wear, and then had a light bulb moment. Chop the straps off and fix up the waist a bit if needed. (Purple dress not cut yet; one dress AWOL.)

IMG_1630

And being the good friend that she is, after showing me her windfall, she let me pick one out for myself. And let me have my favorite even though it was kinda her favorite too! And then insisted I not pay her…  but instead help her with the sewing on the ones she was keeping. : )

Here she is attaching her first waistband – we found a great striped fabric with all the right colors and even thin gold lines.… So pretty!

IMG_1636

And alas, I was typing up directions, then realized half way through that I didn’t have photos of some of the next steps.

And I can’t post a how-to without photos.

So it’ll have to wait til Mo’s over here again to finish her skirt…

But that’s perfect since it gives you time to go browse your local clearance racks/thrift store/op shop/etc and find a cheap and fun but way too short shirred dress.

Other things you’ll need are some elastic (we used 1” wide non-roll stuff), long enough to go around your waist, and a strip of fabric for the inside waistband, long enough to go around your hips plus a few inches. And a sewing machine helps. And matching thread, etc.

Thursday, September 24

Picot Edging How To (and Comparisons)

I am a tester. I like to know things. And I like to be “right,” do things the “right” way, whenever possible.

So is it really any surprise that I recently crocheted four samples of picot edging, trying to find the “best” one? No, the only surprise is that I was able to stop after four; seems like every book and website out there does it differently! But I think I’ve settled on one I like….

First, let me back up a quick moment. Picots are those little loops or bumps that you sometimes see on the edge of ribbon, clothes, etc. And it’s a common edging on crocheted projects.

IMG_1588

The basic technique is the same: space the picots apart with a set number of stitches, often 2 sc, and make each picot with a set number of chains, often 3-5, depending on how big you want the “bump” to be.

But it’s the way the chains connect to the rest of the piece that changes.

Behold, my comparison photos: (this is where some of you start to shake your head, saying, “Karin, they’re all the same!” Undaunted, I forge on.)

IMG_1595IMG_1588IMG_1599IMG_1591

Is it just me or are the bottom two less symmetric, with the left side of the picots straight up-and-down and the right side at an angle? Plus the one at the very bottom has little holes near the bottom of each picot. Not what I’m looking for. So clearly, the top two are better.

Well, then let’s look at the back sides… I like that the grey stitches on top of the pink portion look nice and even on the first (and last) one; the middle two have these funny horizontal “dashes” under every picot.

IMG_1596IMG_1589IMG_1601IMG_1592

So, clearly, version #1 is the winner in my book. (Version #2 is what I used on the scarf because I hadn’t found version #1 yet.) I’ve written the picot stitch as the photo caption. The pattern for a whole row would be:

Ch 1, sc in first 2 st, * ch 3, sl st in first ch of ch-3 (picot made), then sc in next 3 st *; repeat from * to * along row, ending with sc in last 2 st.

The other trick, no matter which picot stitch you use, is to tug each little picot so it lays nice. Sure, if you made a blanket, that might be 264 little picots to tug, but I didn’t say I like to do things fast. I said I like to do them “right.”

Oh, and the final trick – after you’ve tugged all those tiny bumps – is to keep them laying nicely by blocking your finished piece. Here are some photos of the Hello Kitty scarf: top shows “pre-blocked” and bottom shows “post-blocked” . I should’ve lightened up a wee bit on the iron, but maybe you can see how the stitches in the bottom photo are all much flatter and sort of meshed together. That’ll help keep the picots looking neat, too.

IMG_1365 IMG_1375

Maybe another time I’ll tell you about baking three different batches of banana bread, all on the same day (I had lots of brown bananas), then asking everyone in the house to blindly taste them and pick their favorite…

But I think I’ll reserve the next post for my favorite new skirt. Or our new pet and his handmade habitat; he’s “singing” to me as I type this…

LinkWithin

Related Posts with Thumbnails