Friday, May 22

Totes for Terrific Teachers

Not on the list, but they’re something I wanted to make because my middle kid has spent the year with two wonderful preschool teachers, both of whom my older child had as well, neither of whom received anything from me over the years (while other mothers piled on the gifts: at Christmas, end-of-year, some even on Valentine’s day too)...

IMG_3259

So I decided I’d make totes for them this year, but hadn’t yet found my exact vision. That same day, I dropped by ikatbag. Lo and behold, she’d made totes for her child’s preschool teachers  and gave me just the inspiration I needed. Thanks, Lorraine! Like hers, these are reversible.

IMG_3260

Here are a few more close-up photos, partly for you readers who like details but also so I can remember what I did for next time. I should probably jot down some notes too – dimensions, techniques, etc – while they’re all fresh in my mind...

IMG_3246IMG_3256
IMG_3254IMG_3245
IMG_3249IMG_3257
IMG_3253IMG_3244
IMG_3251IMG_3234
IMG_3231IMG_3242 
IMG_3250IMG_3237

P.S. In the interest of time, I didn’t take photos while I was working, which means I didn’t take photos of all my mess-ups before ripping them out and trying again.

But there were plenty of those. Crooked seams. Puckers. Fabric sewed on wrong side out. A tangle o’ thread on the underside of my fabric where the nice smooth beginning of my seam should have been.

Just in case you were beginning to think this stuff is effortless.

The pictures just might make it look that way, but no, there’s lots of seam-ripping effort involved! : )

Monday, May 18

Playhouse Door …and Fruit Blooms …and Dew

Was reminded of this song from my childhood this morning…

I come to the garden alone
while the dew is still on the roses…

I haven’t seen dew in a long time. Haven’t been awake enough, early enough. But this morning, I saw and was fascinated. Tiny droplets on the tips of my lily leaves…

IMG_2956

Oh, and the strawberry plants! Each saw-toothed leaf edged with perfect shimmering beads.

IMG_2959

More flora fascination from a few days ago. I love apple blossoms!

IMG_3029

Looks like a color palette for a little girl’s room: shades of white and pink, and some brown and green, and just a touch of yellow. Mmm.

IMG_3032

We have an apple tree right next to the playhouse...

IMG_3031

…which has seen just a little bit more progress. I finally painted the door. Here’s a before & after…

IMG_3027 IMG_3028

Wanted to post something that’s completed. Because Al’s quilt still isn’t.

Sunday, May 17

Thanks for voting!

It was interesting to see the results of the poll. The clear winner, with 50% of the votes, was the three squares design, the one we were originally going to go with until we realized we didn’t have enough orange left. (I was glad to see the other three got some votes too though – I really liked them too!)

But since it was our original idea and you guys picked it as the winner too, we got creative and made it work without having to go buy more orange. Here’s my momma ironing a border strip after sewing on the two corner pieces – you can see one of the the orange squares corners hanging off the end of the ironing board…IMG_0629

You can also see, in the background, my craft desk that doesn’t quite look it’s supposed to, but I’ll get it whipped back into shape once the quilt is done. Which I’d hoped was going to be this weekend. But that didn’t happen. Although, not for lack of trying… Here I am trying to look awake and enthusiastic while quilting Square # 68 (out of 100).

IMG_0652

Just 32 more sets of squares to quilt into place, then border to be attached (and quilted a little too), and Al’s quilt will be done!!!

Wednesday, May 13

“What do I do…?” Wednesday: Al’s Quilt Corners

I mentioned in my project list post that I’m a little unsure what to do in the corners of Al’s Quilt (due to level of complexity and available fabrics). So I did some more virtual designing in my PowerPoint quilt file and have a few ideas...

Would you like to tell me which one is your favorite corner?

Note: you do not need to be a “quilter” to have an opinion. You just need to have eyes and a brain. And a finger to click the vote button.

Oh, and after the poll I'll talk a bit about the title of this post…

(Click each tile to open a picture of the full quilt.)
orange trianglesthin orange border
3 orange squaresorange patchwork diamonds

(By the way, the poll here and in the sidebar are the same; doesn’t matter which one you use.)

And I’d love to read a comment about what makes it (them) your favorite(s).


As for today’s post title, “What do I do…?” Wednesday gives the impression that this is a weekly thing, like “Menu-Plan Monday” at orgjunkie or “Wordless Wednesdays” (like MaryAnne often does). Well, maybe it will be.

LiEr had a great idea in the comments the other day: to have a regular segment where readers could submit pictures of fabrics they need help with, like I did with the hula girls. I think that would be so fun and inspirational and community-building.

I’m still thinking through some questions I have about it, including:

  • how broad would it be (this post is asking for design opinions, not fabric use ideas)
  • how often would it go (this post’s title seems to suggest every Wednesday, but with me as the facilitator, that’d be a quite a feat!),
  • how would it allow others to share their question (do I feature one person here, or use Mr. Linky to let as many as want to point back to their blog—if they have one)
  • would it really gain a “critical mass” or would my handful of wonderful readers eventually get sick of it
  • what would it be called (not sure yet if I like “What do I do…?” but haven’t thought of anything better yet)

and on and on. I’ll have to think on it some more. Feel free to comment about this too, if you want.

And lastly:

Guess who’s home, safe and sound, albeit missing another tooth?

My Heidi-lein!

Tuesday, May 12

How to turn a Cardboard Castle into a Puppet Theater

Sophie wanted to play puppets, which we can certainly do without a puppet theater. But oh, wouldn’t it be nicer with one? I’ve seen some really nice (and portable) tension-rod-in-doorway versions (LiEr@ikatbag made a cute one). And I’d love to get a wooden one like I had when I was a kid.

But I wanted something now so I used what I had on hand:
   a cardboard castle that’s about puppet theater height,
   some bamboo stakes leftover from last year’s garden,
   some fabric from my stash (recognize the hula girls?),
   and a few bits of hook-and-loop tape (a.k.a. Velcro).
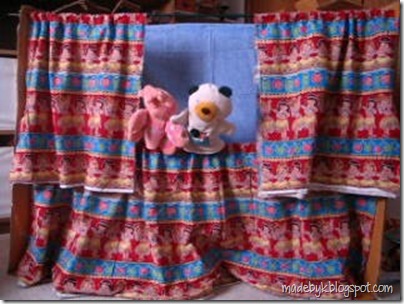
MVI_2866_0001

(For those who want to try this but don’t have a cardboard castle lying around, you could do something similar with any large box. In fact, we found the box our grill came in when cleaning out our shed this weekend. I’m thinking I might try transforming that one too. I’ll let you know…)

Anyway, I tried to keep things quick and easy with this project. You know, before Sophie had moved on from puppets.
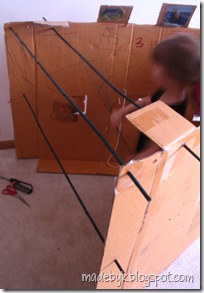
IMG_2847First I poked three holes into each end of the castle: one for the curtain stake, one for the backdrop, and one for the bottom panel. I had Sophie kneel and hold her hands up so I knew how high to put the bottom hole. Here’s a photo after the stakes were inserted. (They’re 4 feet long.)

Next, the curtains. I didn’t want them to be gathered when closed otherwise they’d be really gathered when open and might bunch up too much to open fully. So I held the fabric up to the opening, made a small scissors snip at one end, ripped the fabric (faster than cutting, and oh was Sophie impressed!), folded this new piece in half, snipped and ripped again. Two curtain pieces, each half as wide as the opening. Similarly, I snipped and ripped a bottom panel but made it one-and-a-half times the width of the opening, so it would be nicely gathered.

As for the length, rather than cutting the fabric, I just folded it as needed when held up to the stakes (which happened to be right at the middle of the fabric).

I sewed a line about an inch from the fold to make a casing for the fabric; Sophie really wanted to help so I taught her how to operate the foot control. She did surprisingly well at gauging the speed and knowing when to stop. (My frantic “Stop stop stop!!” might have helped too.) Then she helped insert the stakes into the casing…

IMG_2853IMG_2849 

…and into the holes again. (Got a little harder to do with socks “puppets” on her hands. But she persevered.)

 IMG_2854 IMG_2856

For the backdrop, I used a piece of blue fabric – thought it looked quite sky-ish. It’s not as wide as I would’ve liked but it’s what I had. I considered adding some appliquéd landscape, sun, trees, etc, but decided not to. (More on that in a moment.)

Thinking I might make more backdrops, I wanted it to be easily exchangeable. So instead of a casing along the top like before, I sewed on some hook-and-loop tape at each end and in the middle: one piece along the top edge, the other piece about an inch below that.

backdropIMG_2859

Then I did sew a casing along the bottom edge and inserted a shorter piece of bamboo to weigh down the bottom of the backdrop. (If you watch the video below, you can see it near the end when Sophie lifts up the backdrop.) In the future, I might just weigh it down with heavy washers on clips or something; I’m afraid the bamboo stake will poke someone’s eye out…

We affixed the backdrop fabric to the back top stake and there you go, Sophie had her theater. (And she’d found new socks puppets to use. Wonder what happened to the khaki green ones?)  IMG_2862
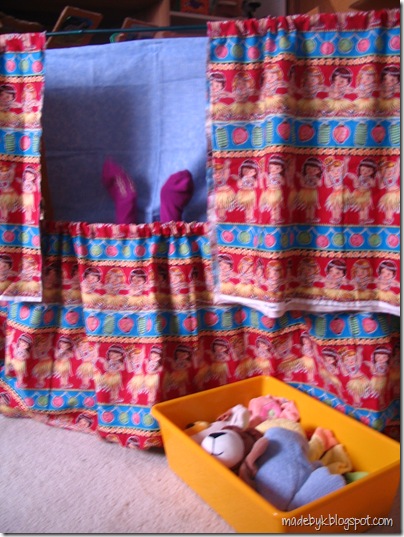
Further thoughts on backdrops: the theater I had when I was a child had four (I think?) different painted scenes; I only remember the image on one of them but I do remember that changing out the backdrops was one of my favorite parts of my puppet theater experience. As I was contemplating what shapes to put on the sky, it occurred to me that rather than sewing anything in place, I could cut out various shapes that could then be moved about to create unlimited numbers of scenery. (Hmm, where have I seen this before? Here, of course—the ikatbag felt boards.) Not sure how well all the pieces would stay up with moving puppets possibly grazing them, but I think it’s worth a try…

To finish up this post, here’s a clip from one of Sophie’s first presentations. I added subtitles but wasn’t sure about a phrase near the end, so surrounded it with questions marks. The movie makes me laugh every time, but then again, I am her mama…  

LinkWithin

Related Posts with Thumbnails