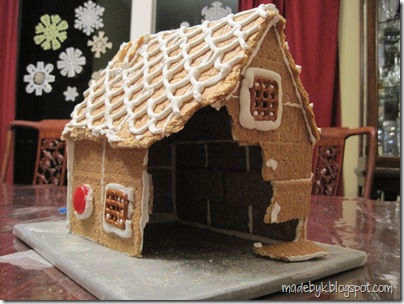
Hurray for neighbors who give me a box of graham crackers when I haven’t planned ahead for an imminent kids’ Christmas party to which I need to bring a constructed gingerbread house to decorate and now I’m surrounded by snow and frigid temperatures and therefore don’t want to take three kids out just to buy crackers or one of those kits that I saw multiple times in various stores yet didn’t throw in my cart for some unknown reason.
We got the house put together and we were only a little late dropping Sophie off to preschool because of it. (We wouldn’t have been late if I’d just let the kids eat Doritos in the car on the way there and called it “lunch.”)
I tried to save time by looking for graham cracker gingerbread house blueprints online, and even started following one of them, but didn’t like where it was headed – too small for 3 kids and a momma to work on, to0 squat, too.... So used the few pieces I’d already cut as a jumping off point and then worked on making a cottage more to my liking, with a steeply-pitched roof and overhanging eaves.

Including the broken pieces we couldn’t use and the ones we ate (better than Doritos for lunch, right?), we used a whole 14 oz. box of crackers. And I snapped a few photos along the way in case it turned out like I was hoping. Here they are if you’d like to try it too…
Oh, wait, the icing. I first made a quick batch of Gingerbread House Construction Glue a.k.a Royal Icing. Which I had never used before but, wow, I really like it!
Royal Icing Recipe (one of many many versions!):
- 1 lb. confectioner’s sugar
- 3 egg whites
- 1/2 tsp. cream of tartar
(I’m told the cream of tartar helps the egg whites get fluffier when mixed… And if kids eating stuff with raw egg in it gives you the heebie-jeebies, you could make it with meringue powder. But I didn’t have that in the house either. Plus we’re a batter-bowl-lickin’ household; I’m good with a little raw eggs in my kids…)
Beat ingredients for 7-10 minutes. Royal Icing dries fast so makes sure to keep it in an air-tight container. I loaded mine into a pastry bag with a round tip – you could also use a freezer bag (thicker plastic than sandwich baggie; less likely to break!) with the corner snipped off.
OK, now the photos…
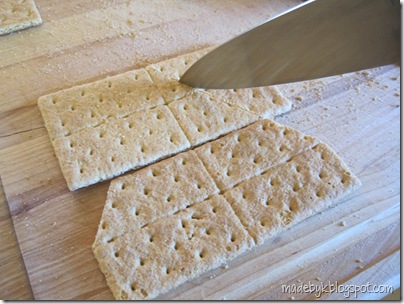
Roof Layout – 8 whole crackers, 4 for each side 
Side walls layout – 6 crackers with about 1/4 cut off each one, 3 crackers for each side
End walls layout – 6 crackers total; for each end, 1 whole cracker and 2 with bits cut off as shown in photo. I found it easiest to line them up, then score a line from the center of the top edge of the top cracker to the middle of the side edge of the second cracker.

Note: for cutting the pieces with minimal breakage, I used the tip of my knife to cut a shallow line, then cut a little deeper on the next pass, and usually by the third, the cracker would break along the line. Sawing with a serrated knife worked well too.
We glued together a “multi-cracker panel” for each roof and wall piece first, reinforcing it along the seams as shown below.
Icing piped along an edge…
Next piece squished into place…
Glob of icing for the reinforcement piece… 
Scrap cracker glued over seam
so it’s less likely to buckle or come apart…  Note from personal experience: Keep your reinforcement pieces near the center of the panels, i.e. not too close to the edges, so they aren’t in the way later during the building part!
Once the panels are set, pipe some icing along their edges and form the house, keeping the reinforcement pieces to the inside – unless you were slick enough to make them look like windows and doors… 
And while the girls were scarfing down their lunches, I realized I could turn the two scraps from one of the pointy wall cuts into a chimney. First, I cut two of the pieces into thirds, as shown below, and cut one of the long rectangles in half.
Then I discarded the two bitty triangles and one of the little triangles, leaving me with four pieces for my chimney…
Don’t have a close-up of the chimney, but here’s the house, pre-decorations. Oh, later we stuck another scrap (1/4 piece) on as the front door.

Have fun! I’d love to see photos if you make this! Here’s ours again…

P.S. Yes, this was supposed to be a “kids activity” but no, my children did not pipe the shingles and the icicles. Or anything else on the house itself for that matter.
They told me where, I piped, they stuck stuff.
The other moms gave me plenty of flack about that. I did eventually come to terms with the idea of letting a 2-, a 4- and a 6-year old wield the pastry bag; next time, I’ll try not to let it take me so long… I sure did love what they came up with on their own.
Especially Sophie’s “fence” (shown below right).

What it lacks in perimeter it makes up for in thickness.
* * *
And coming soon, my latest harebrained project… Or is it hair-brained?