Monday, May 11

Project List

This post is more for me, but read along if you’d like. I’m having trouble remembering all my current and intended projects so have been talking about needing to make a list. Apparently, Sophie picked up on that; this morning, here’s the list she brought me (I wrote the captions as she was “reading” it to me):

IMG_3123
(made with the tulle she found in my stash and made a point of showing me; also shown at the end of this post)

IMG_3124
(never been closer to being done, but am stuck with what to do in the corners… might ask for more help, since you’ve been so stellar with hula girl guidance!)

IMG_3125
(she’s already sketched out the mock-up elsewhere; if I can follow her design, this puppy is going to be stinkin’ cute!!!)

IMG_3126
(seems that February’s and March’s made an impression)

So, here’s my list for now (not in correct order):

  1. ballet skirt(s) -- DONE: 06/15/09
  2. Al’s Quilt -- DONE: 05/31/09
    (especially because I need to soon return Bob, the machine I’m using to do the quilting!)
  3. Sophie’s puppy softie
  4. May June July pillowcases
  5. Sophie’s deer softie and butterfly softie
    (also already sketched out for me!)
  6. grill box puppet theater
    (will make more sense after tomorrow’s post)
  7. corner garden
  8. thank-you gift -- DONE: 06/30/09
    for my friend who lent Bob to me (for four months and counting!)
  9. Kristin’s bags -- DONE: 06/02/09
  10. playhouse window(s)
  11. hula girls skirts/pillows/beanbags/appliquéd Ts/etc.
  12. vierteilliges Flickenkissen
  13. braune Schürze
  14. Dee’s lap quilt (it’s not a surprise, hence not in code)
  15. Sara’s nursing cover
  16. mehr Stillabdeckungen

Wow, that’s not even a dozen. Clearly, I’ve forgotten many. Which is why I need this list… somewhere where I won’t lose it like the last one I wrote. Which is why I’m putting it here…

updated 5/13/09: I keep remembering more stuff but some of it’s for people who read this, so I’m putting it in code. Any Germans reading this, don’t spill the beans. : )

Sunday, May 10

Hula girl help…

IMG_2901A couple years ago, I received a huge container of fabric from someone for free—various kinds, various amounts—including this one covered in paper lanterns and hula girls.

Yards and yards of it!

I’ve covered notebooks with it, I’ve made reversible purses with it, I paired it recently with the cardboard castle and some bamboo stakes (project photos coming soon) and was very liberal with the measuring and ripping. (Or, wait, did I “triplet” it since it was with two other things?)

Yet despite all that, I still have 2 full yards left of it. Plus once the recent project mentioned above loses its luster or is replaced by a nicer version, I’ll have another 3+ yards again.

Y’all got any inspiration or ideas on how to use it up?

I’ve considered making dresses or skirts for the girls, but just can’t convince myself that they’d turn out “cute in a kitschy sort of way” instead of “kitschy in an ugly sort of way.”

Or hey, I’ve been working on some stuff on the playhouse this weekend. (Hmm, will post photos of that soon too.) So, perhaps I could use it to make something for in there? But what? Curtains?

Or if, when you saw the picture, your eyes lit up and your heart started racing and your mind said “Oh, what wonderful fabric; I know just the thing I would make if I had some,” then let me know how much you’d need (and for what) and I’ll send it to you. Seriously. I need to get more stuff out of my house and the hula girls just might be the next things to go…

On Mother’s Day

Some of you enjoyed breakfast in bed this morning. Some of you are surrounded by fresh flowers (either store-bought, or the hand-picked-by-a-4-year-old variety, as pictured below). Some of you are smiling and hugging and laughing with the ones you love. May you breathe deeply the joy that is all around you today.

IMG_1365

But I’m sure some of you are having trouble hearing “Happy” and “Mother’s Day” in the same sentence. Some of you are wondering why life has turned out the way it has, desired children still unborn, or little ones—or your own mom—gone too soon. May you feel peace and comfort in remembering today. And if you know the Good Shepherd, may you rest in the hope that He brings!

To my momma, since I can’t call you today, just wanted to say again thank you. So much of who I am and what I do came straight from you. I love you and miss you!

Friday, May 8

The Start of Gardening Season

Mmm, we’ve had some gorgeous sunny days, followed by rain, a perfect setup for whipping the yard back into shape.

Got my front door garden filled and planted. Hopefully the flowers will fill out a little more. I had visions of it cascading over the front… I guess we shall see…

IMG_2802

Behind the flowers, I planted a couple rows of various lettuce seeds, in the back corner six spots for sugar snap peas, in the corner behind the post some radishes, and then at two random spots at the back, some allysum—the first spot because Sophie spilled the seed packet there, and the second spot to balance out the first one and make it look intentional. Again, we shall see…

The Square Foot Garden (SFG) area in our side yard is entering it’s third year. (Notes about last year here.) Here’s the “before” at the start of last weekend. IMG_2744

We decided it was time to paint them white (for protection and, well, prettiness) and also to make the square one (installed two years ago, following the slope of the ground) level like the long one (installed last year after we realized level is better, the water doesn’t all pool at the lower side then. Plus, I think it’s, well, prettier.)

Here are some in-process shots. We moved some of the dirt from the square bed into the front door garden. Lucy helped with that part. Later, some neighbor friends joined Sophie in looking for worms. Wow, there were a lot of them! (Good news for our garden.)

IMG_2754IMG_2762
IMG_2761IMG_2755

In all this fun, we missed Heidi, of course, but she’s still off having a fab time with Oma and Opa… The skirt she’s wearing is one Oma finished for her right before their trip.IMG_2671 ed

Back to the SFGs, here’s the “after.” Well, sort of. I should add a second coat of paint. Then we also need to refill the square bed. And of course plant stuff! I can’t wait! (To plant, not paint.)

IMG_2965 
In the back yard, we have two little flower beds right near the patio. The one under the stairs was filled with hostas. Until two (or 3?) years ago that is, when Ken oversprayed with some weed killers. Since then it’s been only half-filled with hostas. He killed one whole row!!! (Hmm, I guess I didn’t take a “before” picture, but empty row is visible in photo of Lucy on slide, last photo.)

So anyway, I divided the remaining ones (which were getting way too big) and also stole a few plants from the other bed. Hopefully any residual poison is gone and the newly planted stuff will thrive. We shall see… IMG_2797

(Note: spray weed killers have been banned from our yard. We now pull out dandelions up with one of those dandelion weeder tools. While more time-consuming, also very therapeutic.)

The second bed in back was filled with perennials when we moved in. But since I largely ignored it and didn’t know what I was doing when I did give it some attention, it’s a bit of a mess these days. I tried to clean out what I thought were weeds. And also grouped what I think are good plants near each other again, instead of spaced out all over the bed. What do you think?

IMG_2798

Hush up, people, that is the “after.” Maybe I should clean up a little more of the straw. Oh, and see the tulip, bottom left. It’s my one and only tulip. Not sure where it came from. Just appeared there 4 years ago. Do tulips migrate? (I really know very little about gardening.)

Lucy didn’t help much with the work in back; instead, spent her time on the slide. I got it from someone on Freecycle with the intentions of building a frame for it last summer. But it works just as well set up on our deck stairs—maybe even better since the stairs offer a much safer way for my 2-year-old to get to the top than the usual ladders you find on slides. Wheeeeee!

IMG_2768

So, how green is your thumb?

Wednesday, May 6

How to Make a Cardboard Castle

Time to end the 10-day silence. New passport was received, oldest kid is off with grandparents having a grand time, Ken’s paper is edited and turned in (I shortened it from 101 pages to 83 while adding about 400 commas!), our Internet connection works again. I forgot my camera cord at my mom’s (needed to download pics to my laptop) but then couldn’t find the camera starting Sunday night anyway. Mentioned this to Sophie yesterday morning -- “Oh Lucy was playing with it” she says, walks off, and a minute later is back with my camera. And I borrowed a cord from a friend yesterday, so I’m back in business!

Remember how two weeks ago I said my cardboard category is severely lacking and I’d be posting about that “soon”?

Well, here’s the first one: our cardboard castle. Which has given us oodles of playtime mileage. And which is a lesson for me in letting go of perfectionism, using whatever is on hand, getting it done no matter what it looks like, and letting the kids help. Can you tell they helped?

IMG_2346

It’s made from the box that our kid-sized table came in (thanks again, Ma and Pa Stiles for blessing us with the beautiful table and chairs!!!).  The “box” was really just two large sheets of cardboard with short flaps on all four sides. We fastened two of the end flaps together with what was handiest at the time: white curly ribbon from the gift wrap center in the guest room closet. Hey, it worked.

Anyway, that gave us a nice “hinge” in the middle, making it possible to set the castle up in whatever space the kids want to play in and then easily collapse it and hide it under a bed when I just need to get it out of sight for a while.

For the drawbridge,  we just cut out an arched door shape, then added a loop of yarn so it could be pulled shut. (How could we ever have abandoned the white ribbon? Too curly perhaps?) See photos for lacing example – there are two holes in the door and two above it. I think we made the yarn a little too long. It hangs down too much and regularly catches on people’s various limbs when they’re trying to crawl through. Or run past. It’s been this way for two years now already, but I really should fix it, make it less of a strangling/tripping hazard… Actually, I’m surprised it’s lasted this long; didn’t know yarn was that strong!

 IMG_2359IMG_2360IMG_2362IMG_2361

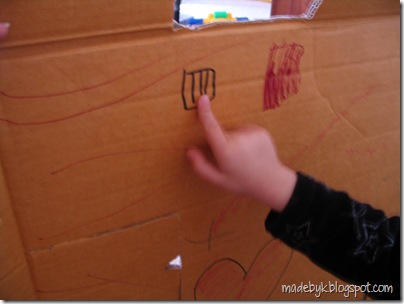
Since it was easy to push the door open again from the inside, but not so easy from the outside, we added a little “keyhole” so little fingers could reach in and have something to pull. Similarly, on the windows, we cut a little notch into a side so they can be pulled open or shut, instead of only pushed. Can you see them down below?

IMG_2356

IMG_2346 Speaking of windows, only one of them is a cut-out square; the rest all have little doors (shutters?) that “hinge” open on an uncut, creased side. It’s easiest to make the creased side so it’s parallel with the corrugation. So in the large photo above, that’s why the window on the right opens downward; the crease is horizontal because the corrugation is horizontal. Make sense? (The window on the left opens sideways, but that’s just because we used a fold that was already in the cardboard.) You can crease things perpendicularly to the corrugation. In that case, I’d recommend first pressing a fold line into the cardboard. To do that, I hold a straight edge in place, then run a blunt object along it, like a capped pen. Then I keep the straight edge in place as I slowly bend the cardboard .

If this is way too wordy or confusing, my apologies; brain is still foggy and I’m not a coffee drinker…

Oh, and for cutting, I think some people use a craft knife, a.k.a. razor blade. But they seem so puny, especially when I’m cutting the two-ply stuff. Maybe mine is just too dull. I like to use a kitchen knife, the one in my set that has a really thick, strong blade (and doesn’t really get used for much else other than cutting cardboard anymore; the other knives in the set have all my food needs covered)...

IMG_2349 

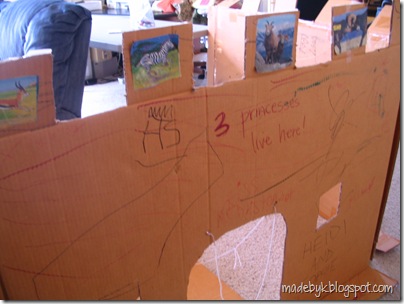
Oh, and the turrets (or whatever they’re called). We just cut evenly spaced lines down, then cut across the bottom of every other one. In the photo below, they’re standing up nicely (I did that for the photo) – usually they’re more floppy because there was a crease already in the cardboard all along their base. I’ve considered gluing some reinforcement squares over the crease on each turret, but so far, no kid has come to me saying “Oh, I wish the turrets weren’t so floppy” so I’m just going to leave well enough alone.
IMG_2366

OK, so you’ve seen the drawbridge, some of the windows, and the exotic wildlife menagerie (see turrets in above photo). Here’s a quick tour of some more of the castle:

Sophie’s chambers,IMG_2365

Mommy’s chambers (a tad more cramped than Sophie’s), IMG_2351

and the “dirty dungeon” (according to 4-year-old Soph).IMG_2354
IMG_2363

Hmm, I think I might have some leftover grey paint in the garage. Maybe I’ll let the girls go at our “stately structure” with paint brushes this summer…   I’d be sad to see the dirty dungeon covered up, but wouldn’t mind losing sight of the paper-glued-on-using-an-entire-gluestick. (A few weeks ago, I also nixed the idea of barring entry to the castle by taping the drawbridge shut… but only after they had already used an entire roll of tape to do so! Are my kids the only ones with a deep and passionate love of sticky tape?)

LinkWithin

Related Posts with Thumbnails